It's been a quiet Christmas at Micawber Towers - probably the quietest ever. We're both recovering from a rather nasty virus, so we stayed home to spare the family any chance of infection. We slept in, ate a simple breakfast, napped, read, napped some more, played a few games of Chinese Checkers, had another small meal, then watched a bit of Lord of the Rings: the Two Towers (we're a little behind on our annual viewing of the classic film trio). Then another nap for Mr. M, and some photo-editing and blogging for me.
Here are a few photos from last week's (pre-virus) Christmas-tree-cutting excursion, which took place under a brilliant December sky....
Today we'll finish up the series by learning how to use I-cord as edging for crochet.
I-Cord as Edging
I-cord edging is soft, flexible, and elastic. It wraps around the fabric edge, so it looks good from both sides while offering protection from over-stretching or abrasion. Its clean lines offer a crisp visual contrast to crochet's somewhat busy texture.
I-Cord Edging as Intermediate Rows/Rounds
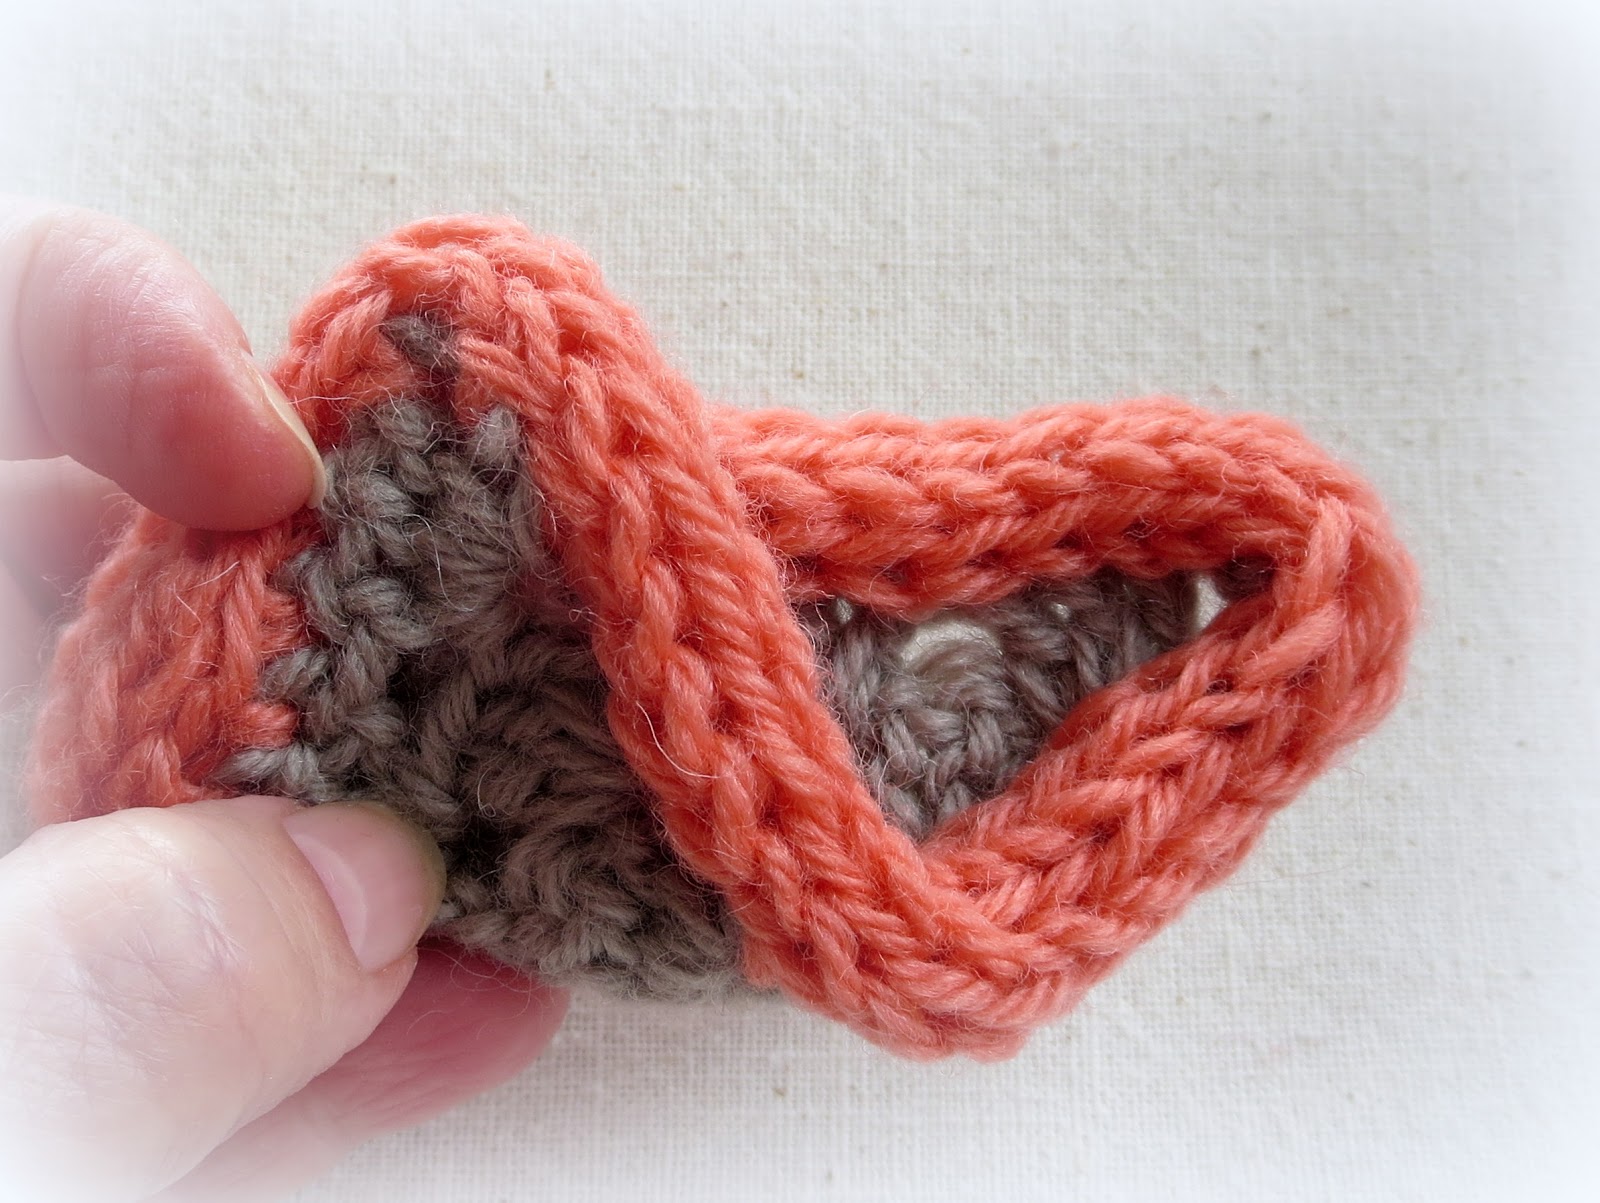
I-cord edging can double as a foundation for further rows of crochet, as seen in the cross-section photo below (from a cowl pattern to be included in my upcoming cable book).
You might be wondering: why use I-cord in the middle of a project, when the same look can be achieved with other stitches such as slip stitch or back bar hdc? In this project, the I-cord edging provided necessary structure, and helped counteract the fabric's tendency to curl.
So how is I-cord edging made? Let's find out! (Note: there's more than one way to make I-cord edging; I've chosen to demonstrate the one that works best for me. See Technical Q & A below for a link to another method.)
Videotutorial
Phototutorial with Instructions in Plain English
This tutorial is for a 4-stitch cord, but you can adjust that number to suit your preferences. A minimum of 3 loops is recommended. (For a "cheater" 2-loop I-cord edging, see end of post.)
Instructions are written for right-handed crocheters.
What you’ll need:
A piece of crochet - can be solid, lacy, or both
Yarn for edging
Hook
Yarn needle for weaving in
Stitch holder (can be a bobby pin or just a scrap of yarn)
Optional: Extra hook two or three sizes smaller (for hooking up Afterthought Column)
Link to tutorial for technique used in this post: Working the I-cord Body (scroll down in post for tips on working I-cord with a hook)
Starting the Edging
1. (RS) With right side facing, attach new yarn with slip stitch in any stitch of your project.
2. Chain the desired number of I-cord loops (I chained 4).
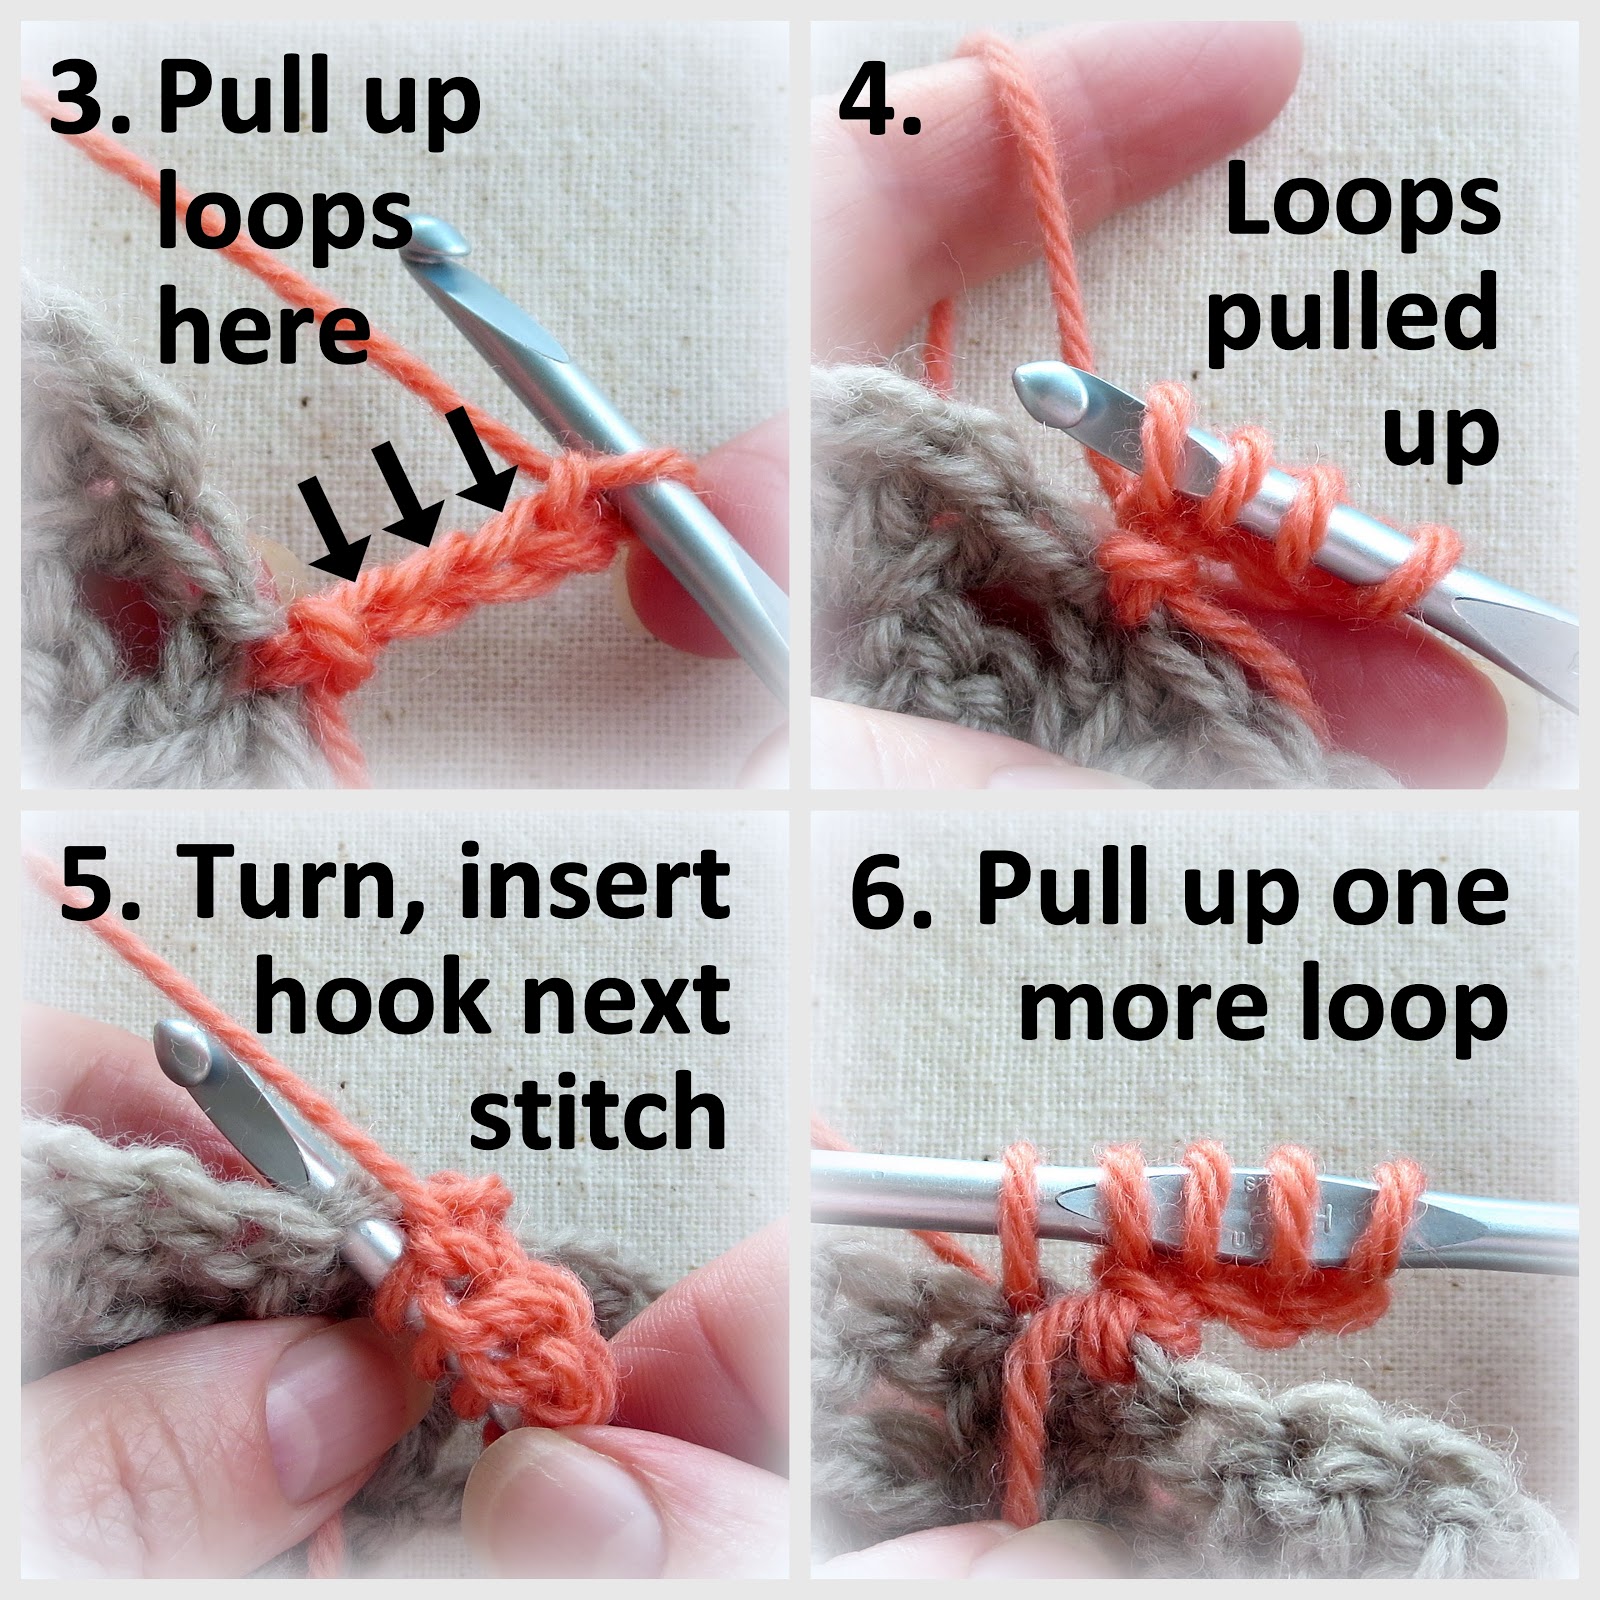
3 - 4. Starting in the second chain from the hook, insert hook in back loop of chain, yarn over and pull up a loop. Repeat in the next 2 chains - 4 loops now on hook. (Note: if you're making a different size of I-cord, you'll have a different number of loops on the hook.)
TURN.
5 - 6. (WS) With wrong side of project facing, insert hook into next crochet stitch, yarn over and pull up a loop - 5 loops now on hook.
7. Remove hook from loops. Place rightmost loop on a holder and forget about it for now.
Next Row
8. Being careful not to twist loops, insert hook into rightmost free loop, yarn over and pull up a loop.
Repeat in next loop. If you're making a 4-loop I-cord, you should now have 2 loops on your hook, and 2 empty loops remaining.
9 - 10. Insert your hook into both remaining loops(right loop first, left loop second), yarn over and pull up a loop.
11. Insert hook into next crochet stitch, yarn over and pull up a loop - 4 loops now on hook.
Tips:
Always check that each loop is properly oriented before inserting the hook.
Gently pinching the base of the row can help keep loops facing forward.
Following Rows
*Remove hook from 3 leftmost loops, leaving only the rightmost loop on the hook. Yarn over and pull up a loop, insert hook in next loop, yarn over and pull up a loop, insert hook into both remaining loops together, yarn over and pull up a loop, insert hook into next crochet stitch, yarn over and pull up a loop (4 loops now on hook). Repeat from *.
Note: Each time you work these 4 loops, you're making and attaching a new row of I-cord to the project. The first 3 loops are the actual I-cord loops; the 4th loop is what I call an "attachment loop". (More on this in Technical Q & A below.)
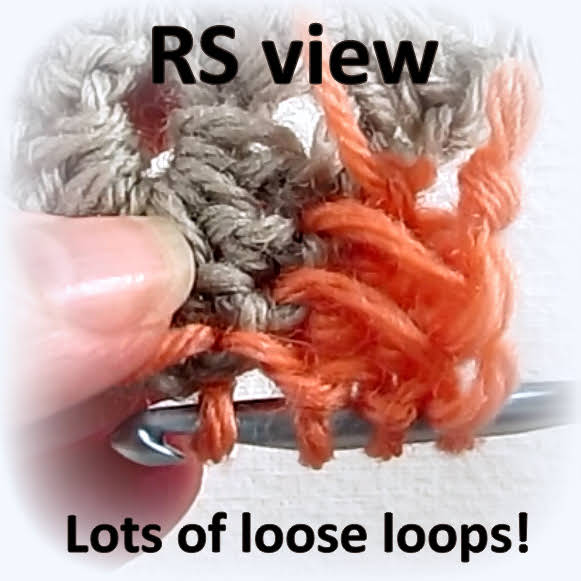
Tip: Keep a relaxed stitch tension when working I-cord rows. Here's what your I-cord should look like on the back (which is the RS of the project):
Don't tighten the loose loops; we'll need them later.
Working Into or Over Spaces
When making I-cord edging, there are two ways to deal with spaces or corners in your crochet.
12 - 13. You can attach multiple I-cord rows in the same space or stitch. Photo 13 below shows 3 rows of I-cord worked into the corner space.
14. You can work detached I-cord for as many rows as you like, then re-attach to the work on the other side of the space.
To work detached rows, do not pull up a loop in the next stitch or space. With one less loop on the hook, work standard I-cord rows (yarn over and pull up a loop in each loop from right to left, remove hook from all but rightmost loop, repeat) to desired length. When you're ready to re-attach to the crochet, insert your hook into the desired stitch or space, yarn over and pull up a loop. Photo 14 below shows a few rows of detached I-cord that have not yet been re-attached to the project.
Tips:
When working into or around spaces or corners, work the same number of I-cord rows as you would crochet stitches into that space. For example, in the triangular sample below, I worked 4 rows of I-cord into or over each corner.
You can combine the two methods (attached and detached) in any stitch or space.
Either method can be used to increase stitch count, add circumference to a fabric edge, or create special effects (e.g. decorative detached I-cord loops along an edge).
To tighten up a fabric edge, simply skip a stitch or stitches before pulling up the next attachment loop.
Ending the Edging: Afterthought Column
Not pictured:When you have pulled up the final attachment loop in the last empty crochet stitch, remove hook and place all loops on a holder or scrap of yarn. (These loops will be called "live" loops.)
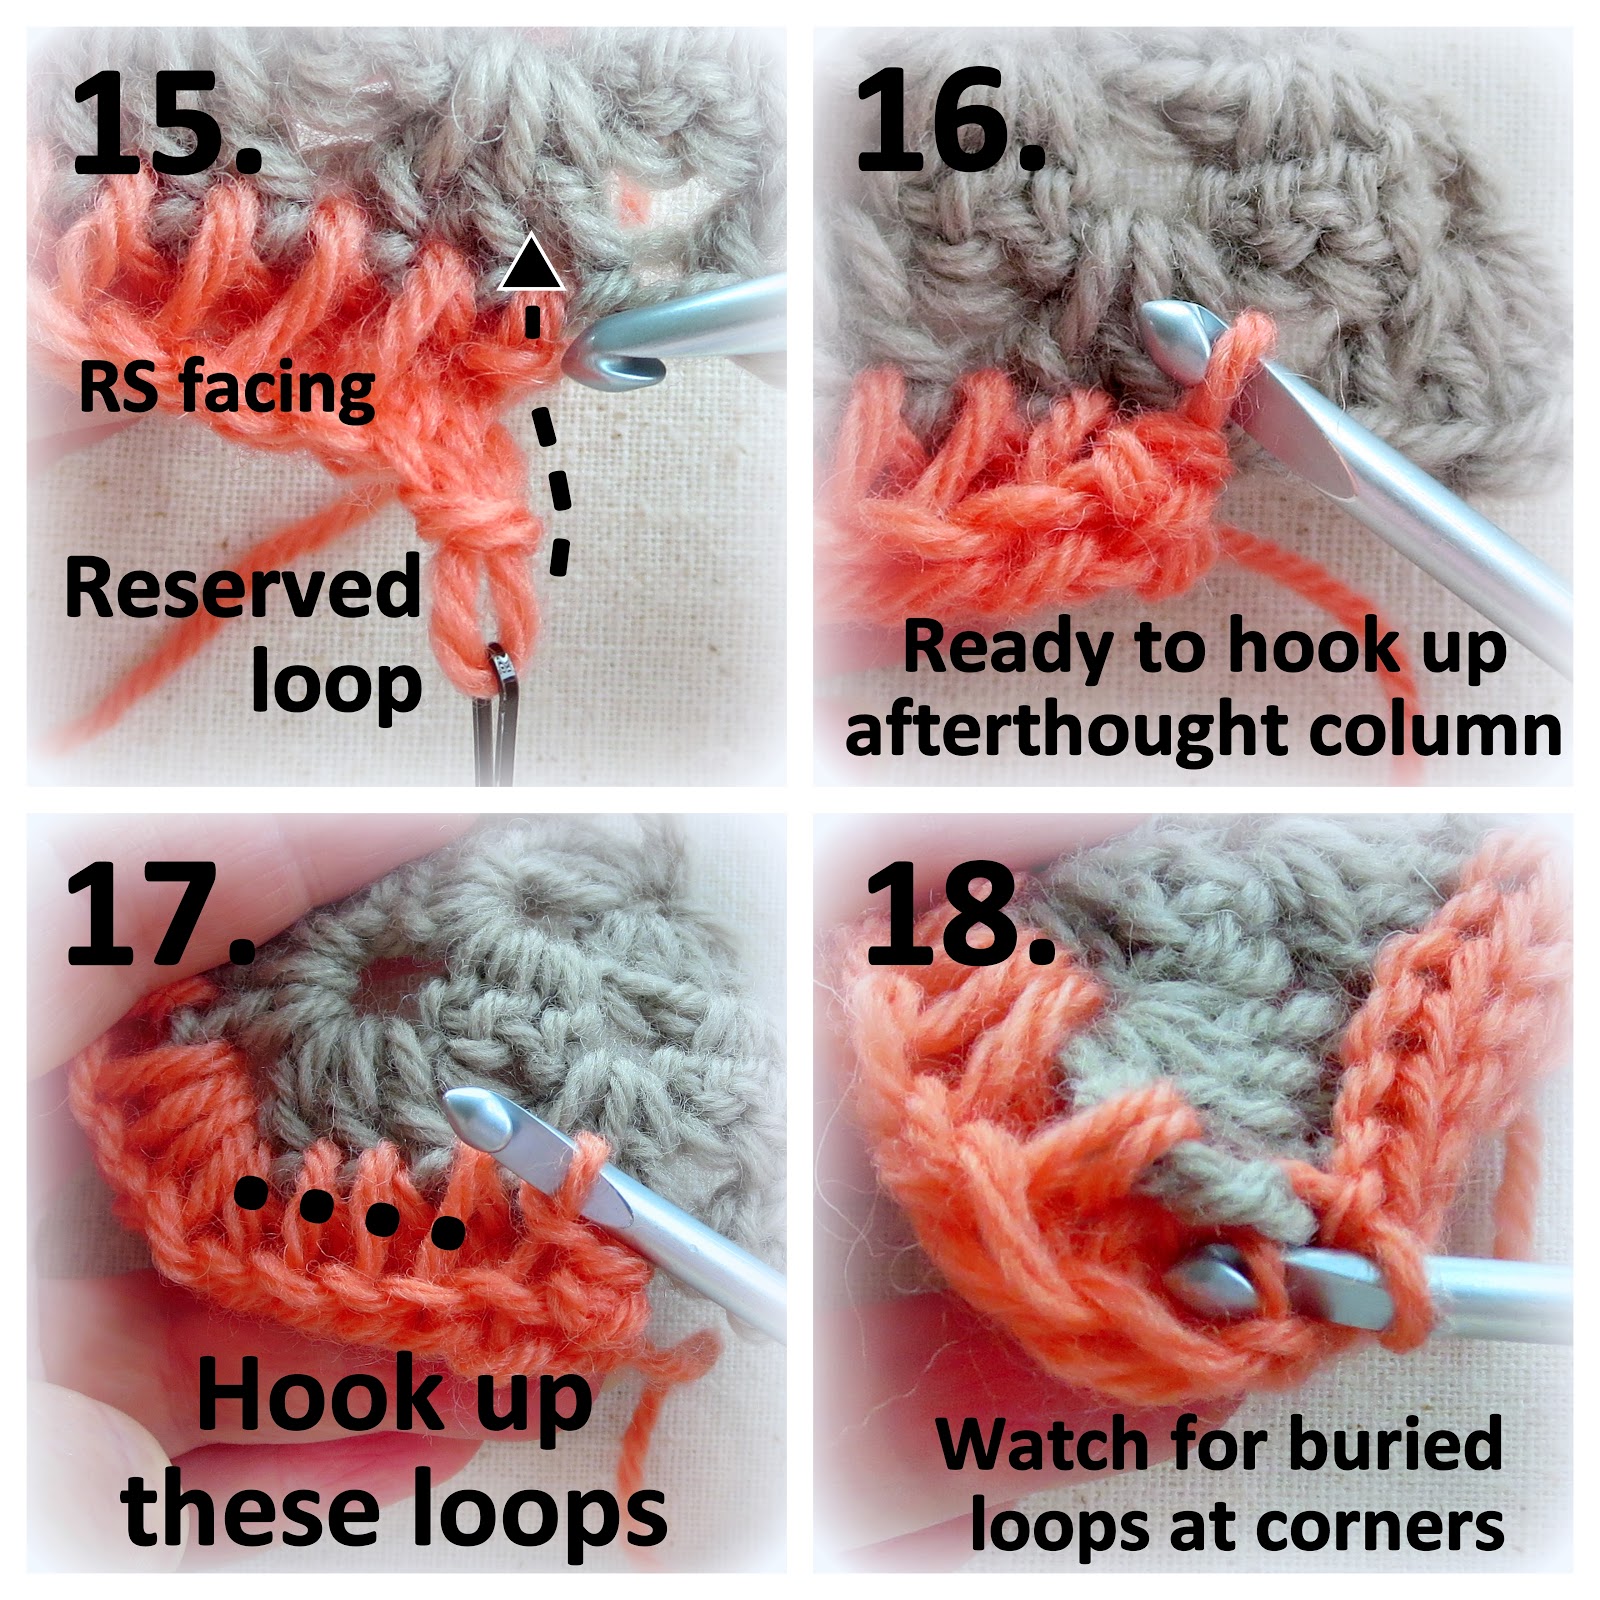
15-16. Take original reserved loop (from Step 7) off its holder. Insert hook from bottom to top through slip stitch used to attach edging yarn, place reserved loop on hook, pull reserved loop through slip stitch.
17. With RS of project facing you, insert hook under first loose strand; pull strand through loop on hook. *Insert hook under next loose strand, pull through loop on hook. Repeat from * around the project.
18. If you worked any detached I-cord at the corners, the "loose" strand may have tightened up and be hard to find. See second note below.
Tips:
Be careful to hook up 1 strand for each row of I-cord. (If you miss a row, your edging will pucker.)
Each row of I-cord will have two strands under it, forming a V that resembles the legs of a single crochet. Make sure you pick up the strand that is attached to the rightmost I-cord loop. (To check, tug on the strand as you pick it up. The I-cord loop nearest you should tighten up.)
19. When you have hooked up the last loose strand, place the loop on the holder with the other live loops. Cut working yarn, leaving a 6" tail. Thread the tail on a yarn needle.
Seaming the Ends
Before starting the seam, identify the stitches you will be attaching to (I call them "target stitches"): look for the first row of recognizable I-cord loops just above the I-cord starting chain.
Note: You should have 1 more live loop than you do target stitches.
To begin the seam, insert needle from back to front through the rightmost loop on the holder.
Pass needle behind the 2 legs of the target stitch.
Insert needle from front to back through the originating loop; tighten gently. First duplicate stitch made.
Repeat this step, working across the row, until you have 2 live loops left on the holder, and 1 target stitch left in the target row.
Keeping leftmost loop behind, insert needle from back to front through both remaining live loops, pass needle behind 2 legs of the last target stitch, insert needle front to back through the 2 loops.
Seam is now complete.
Before weaving in the ends, tighten or loosen the seam loops as needed to match surrounding stitch size. If tightening, work from right to left (or beginning to end) of the seam. If loosening, work from left to right (or end to beginning).
Weave in ends and admire your nifty I-cord edging!
Technical Q & A
Why is the hook inserted into 2 loops at once on every row?
To maintain the stitch count. Each time you pull up an attachment loop from the project, you're adding a loop; inserting the hook into 2 loops at a time acts as a decrease to get you back down to the desired number of loops. (Confused? Read on.)
The tutorial shows you picking up 4 loops for every I-cord row, but then you hooked up an extra column of loops after the fact. Doesn't that make it a 5-stitch I-cord?
No; it's still a 4-stitch I-cord. As mentioned (far) above, the last loop picked up in every row is what I call an "attachment loop". It doesn't count as an I-cord loop; instead it acts as the "legs" of what will essentially become a single crochet attaching the I-cord to the project. What I've initially worked in this tutorial is a loose, attached 3-stitch I-cord; hooking up the afterthought column adds the 4th I-cord loop to every row. (It's kind of mind-blowing, for me at least, but if you count the visible I-cord loops after hooking up the afterthought column, you'll find that there are only 4 columns of loops.)
You mentioned that there's another way to make I-cord edging? Yes; there are two basic methods for making attached I-cord, and I've shown you my adaptation of one of them. The other basic method is worked RS facing; it eliminates the decrease, and instead inserts the hook through the last I-cord loop and the next crochet stitch at the same time. You can find an example of it here.
The other way seems more straightforward; why do you prefer your method? I found that working the I-cord loosely from the WS, then hooking up an afterthought column on the RS, gave me a smoother, stretchier result, with no crochet stitches visible between I-cord loops. I'd encourage you to try both methods, and see what works best for you.
~ ~ ~
But wait, there's more!
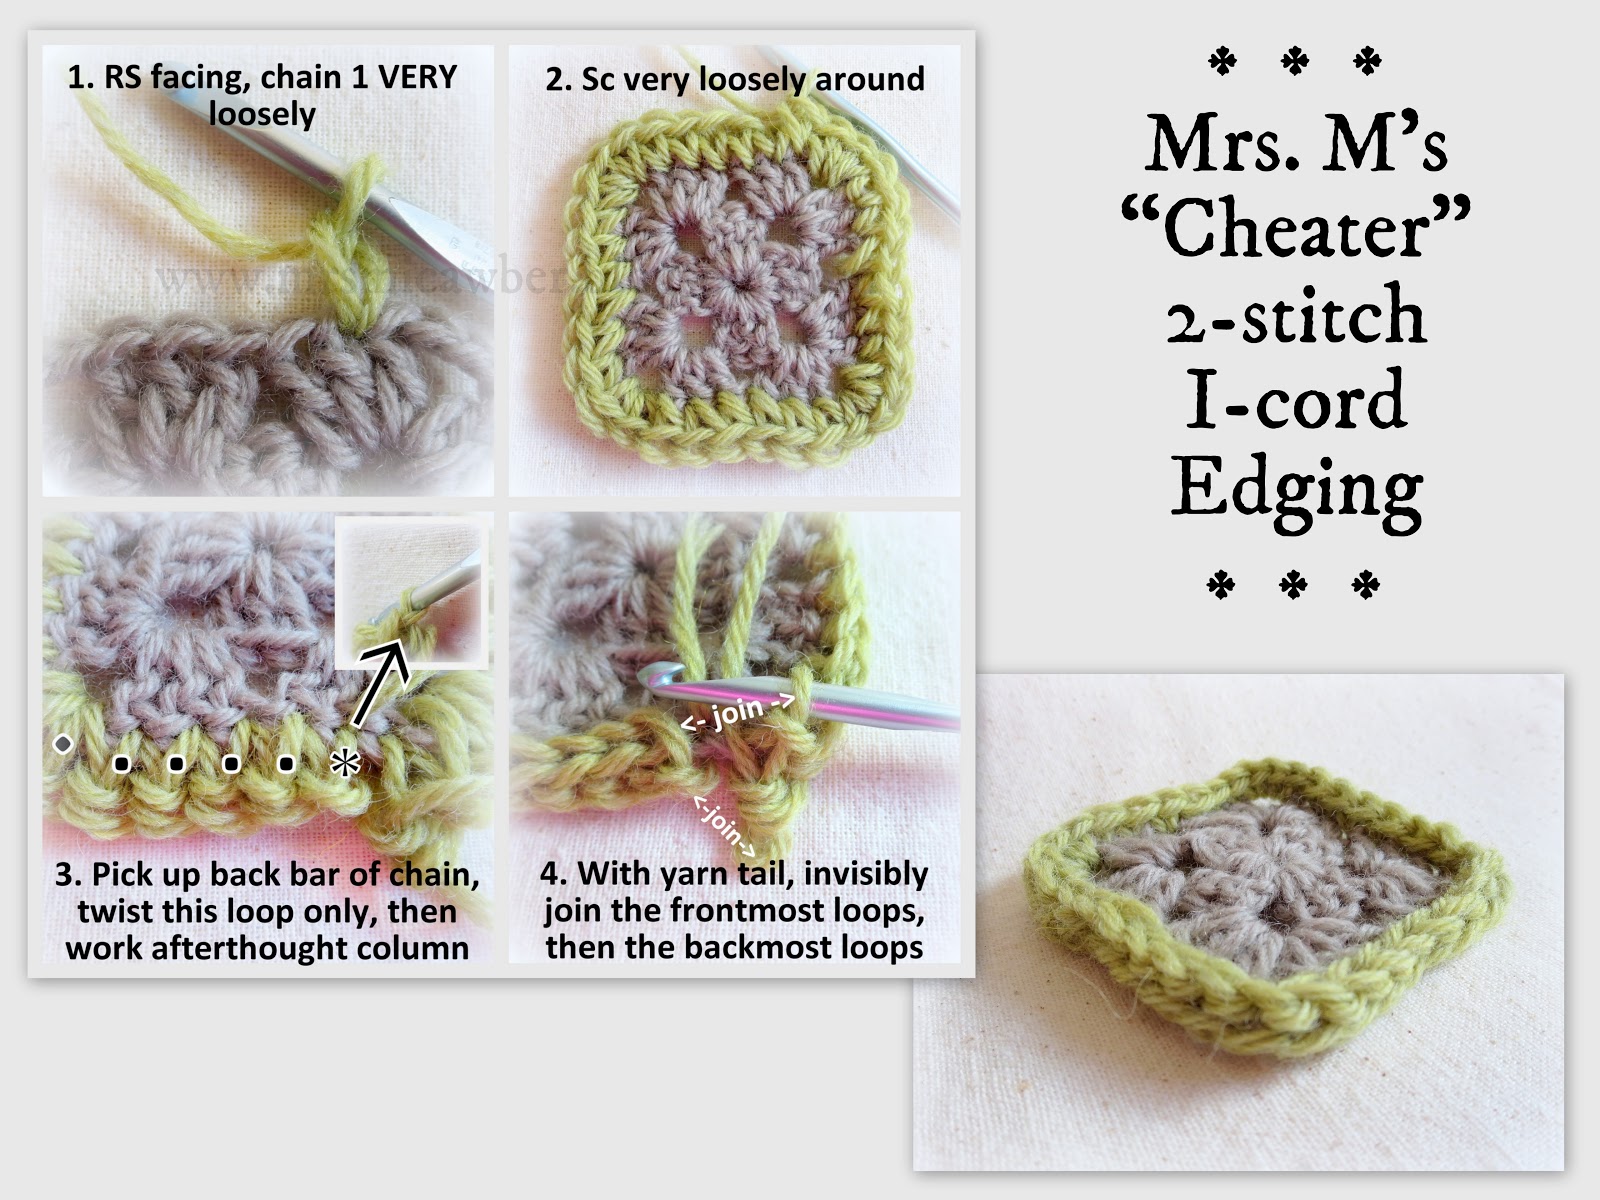
Cheater 2-Stitch I-Cord Edging
This minimal I-cord edging gives an interesting double-chain edge to any flat piece of crochet. It's especially appropriate for pieces that will later be joined by seaming or other methods.
With RS facing, using attached yarn or project yarn, loosely chain 1.
Starting in the next stitch, work 1 round of very loose single crochet. Place working loop on holder. Do not turn. Tip: The easiest way to work loose stitches is to pull up a very TALL first loop at the base of the stitch.
Flipping top edge of work towards you so you can see the back of the stitches, insert hook from left to right into back bump of chain stitch, then rotate hook to face in the proper direction. This will form a twisted loop on the hook (do not twist any other loops but this one.)
*Insert hook under nearest "leg" of next sc (2 loops now on hook), pull second loop through first. Repeat from *, being careful not to miss the final sc. Place final afterthought column loop on holder.
If working in the round, join ends with a double invisible join (remove holder from working loop, join with invisible join to first sc of round; bring yarn tail from back to front through final afterthought loop, remove holder, join with invisible join to twisted loop).
~ ~ ~
Whew!
This post (and series) has taken months to finish; sometimes I thought it would never be done. Anyone who has read this far probably feels the same. :D
If I-cord fascinates you as it does me, you might enjoy the following links:
Autumn color this year has been a patchy affair. Weeks of rain and wind knocked the blazes out of the tender sugar maples, tearing down their glory of scarlet leaves before they could finish turning. Walnut trees quickly gave up the fight, and dropped their bright gold with scarcely a whimper.
So murky and tempestuous was the weather that I almost despaired of getting any fall-color photos. But finally, one Thursday afternoon, the rain stopped long enough for a walk to the park.
There I saw mushrooms growing under oak trees:
A charmingly haphazard arrangement of oak leaves caught in a fence:
The last of the asters, shivering in the wind:
Straggly coneflowers daring to bloom in the cold:
Maple leaves blown sideways by the icy blast:
Burning bush living up to its name:
A tree caught in the act of changing:
Another in full autumn dress:
At last! Some of the colour my soul had been craving:
Small white asters still blooming next to the lake:
And, on the way home, rivers of gold in the gutter:
I'm glad I caught a bit of fall colour after all.
Sunday Walk
A few days later, on a drizzly Sunday afternoon, I walked to the prairie restoration project. Along the way, the marshy lake-around-the-corner floated a living carpet of wild geese. Here are just a few of them:
A trail through trees is always fascinating:
No living flowers were spotted on this walk, but I saw plenty of interesting dried ones:
The prairie grasses are lovely in autumn, but very hard to photograph (especially on a windy day). I love the delicate seeds of this variety:
Also spotted were several flavours of chocolate-colored leaves, and a feather in the grass:
Tawny grasses, nearly-bare tree, and winding green path under a leaden sky:
More wild geese on a pond, with a hint of autumn colour behind them:
Autumn is beautiful no matter what the colour of the sky, but oh, how we were longing for sunshine....
~ ~ ~
Thursday Ride
Finally, after all the weeks of November-like gloom and damp, October finally woke up and started behaving itself. The first chance I got, I headed out on the bike for some icy-fresh autumn air and sunshine.
Birch trees sported lime-green leaves, and oaks were shining bronze, under the brilliant blue sky:
A leaf lay on the road next to my wheel:
Another oak blushed rosy-red:
"Where are you going this fine day?" asked a friendly calf:
"Up the hill to look for treasure," I replied.
I found it, too. Golden sunshine:
Ruby leaves:
And sapphire water under turquoise skies:
A glorious autumn ride.
Sunday Ride
A few days later, the sun still shone, though the wind was fiercely cold.
Here's Iris the bike resting against the bridge at one of my favourite photo spots:
Iris and I passed gates propped hospitably open into a drying cornfield:
Then rounded a curve...
...to see a flock of turkeys sitting in the middle of the road ahead. Of course by the time I got my camera out they were scurrying for the woods:
Racing my shadow along the edge of a marsh:
One last photo, of larch trees turning pale at the thought of winter to come:
The cycling season is winding down. I don't know how many more rides the year holds, but I hope they're all as beautiful as the last few have been. (And I hope the October weather continues sunny!)
How's October treating you?
~ ~ ~
P.S. Several readers have emailed me to say they haven't been able to leave comments, so I'm trying out some changes with the commenting system below. If you are able to leave a comment, would you let me know how it worked for you? Thanks. :)